7th Grade Computer Science
We'll Pencil Code you in.
- Course Length: 18 weeks
- Course Type: Elective
- Category:
- Technology and Computer Science
- Middle School
Schools and Districts: We offer customized programs that won't break the bank. Get a quote.
CoffeeScript, HTML, and CSS all have their place in the computer-programming world. Wouldn't it be great if we could use one tool to program in all of these languages?
Actually, we'll answer that for you: we can.
Pencil Code is the answer to all your web-based programming prayers. Just like the work you might have done in Scratch, Pencil Code gives you the drag-and-drop tools to create interesting code while also letting you pull off the cover to see the CoffeeScript below.
This course is filled with opportunities to use CoffeeScript, HTML, and CSS to create art, games, and websites all using Pencil Code. With the ability to use drag-and-drop blocks, to work in multiple languages all in one spot, and to collaborate with other programmers, you'll be able to build anything on the web in no time.
This course covers all the essentials, like:
- Problem solving with algorithms and flowcharts
- Variables and data storage
- Conditionals and control blocks
- Loops, both of the for and while varieties
- Functions
- Abstraction and how it fuels technology
- How the internet works
- Webpage design
The best part? This semester-long CS course is all aligned to CSTA Standards. You'll even be able to both Snapchat yourself programming while understanding how that Snapchat makes it to your friends. Hopefully there's a sticker for that.
Unit Breakdown
1 7th Grade Computer Science - Getting to Know Pencil Code
Welcome to the wonderful world of Pencil Code. It's the language we'll be using for most of the course, so pay attention to all the details like typing in the website name, saving projects, and figuring out what that fd() function does, anyway.
2 7th Grade Computer Science - Care and Maintenance of Your Data
Whether we're talking about computers, technology, or money, it all comes back to change. Admittedly, change in the computer doesn't make your pockets heavier or get you dirty looks from the cashier as you try to pay entirely in pennies, but it does help you store and change values, which is surprisingly helpful in computer science.
3 7th Grade Computer Science - Flowcharts and Algorithms
Before you get really into programming, we're going to take a brief tour of the planning tools you can use to help keep code organized. That way, you can make sure your logic actually works before you jump right into dragging blocks around. You can thank us later.
4 7th Grade Computer Science - Go with the Control Structure
Not everything in computer science is predetermined. In fact, if you want your program to interact with the user, you've got include some control structures, or code blocks that tell the computer to run some code if one thing happens and some other code if a different thing happens.
5 7th Grade Computer Science - Loop-de-Loop
Another form of control structure, the loop, makes its grand appearance in this unit. Feel free to imagine it walking down a very tall staircase to make its grand entrance, because it's a pretty big deal in computer science. When combined with conditions, loops get really powerful, really fast.
6 7th Grade Computer Science - What's Your Function?
To put it simply, programs couldn't function without functions. (Yes, we did really enjoy writing that sentence; why do you ask?) A function is a named call that could run any number of lines of code—and you'll never see them because they're hidden behind the function name. Code becomes way more organized with functions. It's like when you clean your room by stuffing everything in a big pile in the closet…except that doesn't actually make things organized.
7 7th Grade Computer Science - The Hangman Cometh
This unit's a brief interlude from new concepts to focus on the application of functions, loops, and conditions. You'll spend an entire week thinking about Hangman (the game, not the person…or the song), which should result in a bona fide game.
8 7th Grade Computer Science - Abstracting the Net
Not to get too philosophical on you, but this unit's all about the abstractions that make computers—and the internet—function. Without them, we'd have to write code in zeros and ones. Not even blocks could help us learn that.
9 7th Grade Computer Science - Pay Some Attention to the Coffee Behind the Curtain
As fun as Pencil Code is, most programming languages don't have colorful blocks you can stick together. That's why, in this unit we'll be introducing you more thoroughly to the programming language behind the blocks: CoffeeScript. Afterwards, you'll be one step closer to being a super hacker. Or at least a software engineer.
10 7th Grade Computer Science - HTML and CSS
Since we're coding on the web, it's nice to know how to actually make the web. With HTML and CSS, you'll have the ability to make webpages for everyone—including people with disabilities. That's the goal, anyway.
11 7th Grade Computer Science - The Final Website
Final units mean final projects. This time around, it's all about using HTML and CSS to make a multipage website. You won't even use Pencil Code for all of it; this one's all between you and your computer. But no pressure.
Recommended prerequisites:
Sample Lesson - Introduction
Lesson 1.04: Fantastic Beasts and How to Code Them

(Source)
Fuzzy requirements are a way of life for software designers. We're talking about those times when you're asked to code something, but the directions are incomplete, unclear, or nonexistent. Sometimes, this can be a real pain in the you-know-where. (No, not your earlobe.) Other times, fuzzy requirements mean you're free to get all sorts of creative.
Just because a project lets you stoke your imagination stove doesn't mean you can throw your programming prep out the window, though. Not even close. You still need to visualize what you're going to draw ahead of time, be realistic about what is and isn't possible in the time you've got, break your picture down into manageable parts, and craft a strategy for the most efficient way to get the job done. What order should your commands be carried out in? What are your parameters? Should that dragon be green or brown? Can a dragon wear a fedora without looking like a huge dork?
Today's fuzzy requirement: drawing an animal. Yup, we totally planned it so that the fuzzy requirements were fuzzy in themselves (assuming you aren't planning on drawing a Sphynx cat or something).
In the professional world, all that prep is called "gathering requirements." Putting in the time and effort up front to stake out a coding strategy may seem like a grind, but trust us: it'll end up saving you a lot of work, headaches, and even cash—if you're prone to chucking your computer out a third-story window in a fit of programming rage—in the long run.
Sample Lesson - Reading
Reading 1.1.04: Wild Kingdom
In the last lesson, you drew a house. In this lesson, you're going to draw something to tear up all the furniture inside that house or maybe get lost under the living room couch. That's right: you're going to draw an animal.
Not just any animal, though—an animal of your own choosing. You can pick a cat, dog, turtle, fish, mongoose, or anything else you can think of. The trick here is to pick something that's both interesting and fairly simple. Think back to the last lesson and remember the work involved with drawing a simple house. A peacock, while marvelous to look at, could take forever to draw.
We're throwing you into the wild on this one, and giving you the freedom to draw whatever you want. (Get it? Wild? Because we're talking about animals. We know, we know: we're hilarious.)
As you decide what to draw and start sketching it out, here are some things to consider.
First Thing to Consider
First, shapes with the same color meld together. That means you can crank out some unique shapes by putting one shape on top of another. Here's a circle on top of a square, for example. Since they're both the same color, you can't see where one ends and the other begins.
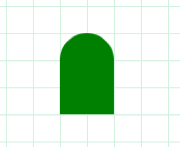
Now it looks like a citadel or an upside-down finger nail with some snazzy polish.
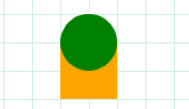
Each drawing you create will show up on top of the things you made earlier in the program. In the example below, we drew the orange box first, then we drew the green circle afterward:
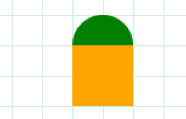
In this next example, we drew the green circle first, and the orange box second:
Keep that in mind as you design your program.
Second Thing to Consider
A wrong angle early in the program will make everything after it wonky. That's the bad news. The good news is that fixing that one angle can bring everything back to normal.
Check out what happens if we change one angle from 135º to 90º early in the program for our house:
It looks like an abstract painting that you'd find in the lobby of an apartment building from 1988. Woof.
Since each instruction in our program relies on past instructions, changing one angle messes up almost everything that comes after that change. (In this example, we must've used moveto for the sun because it's the only thing still where it's supposed to be.) By the same token, fixing that one angle puts everything back where it belongs.
Be careful with your shape placements, is what we're trying to say.
Third Thing to Consider
Don't try to write the whole program in one go. Do part and then run it to see if it does what you think it should. Make any corrections needed and run it again. Repeat this process until your program's running right, then move on to the next part. This process is called debugging—and if your code is buggy, don't feel bad. No one, including the most experienced coders, gets it right the first time. (Did you see our house scramble? It happens.)
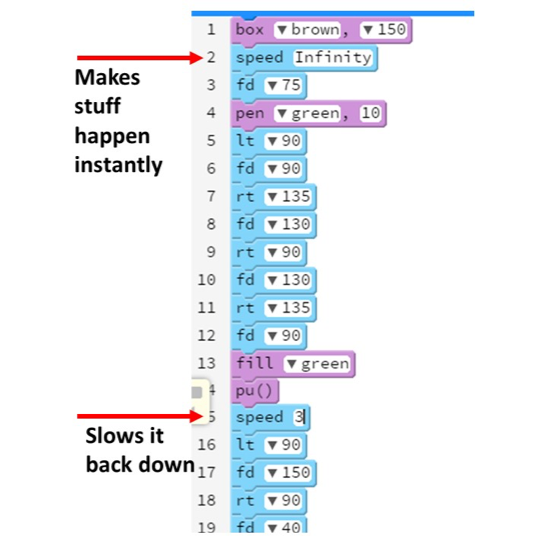
While you're debugging, don't forget that you can use the speed commands to speed up and slow down parts of the program. That way, you can see what's happening in one part without having to wait forever for the program to get through the stuff you already know is right.
Here's an example of how to make the speed commands work for you:
Using the move and jump commands can save you a lot of time and effort, too, once you get the hang of the number system.
Last Thing to Consider
Here's our last tip: animals are symmetrical. When you get the code right for one eye, for example, you only need to figure out how to move your starting point, and then copy the same code for the other eye. Sometimes in coding, copying is good.
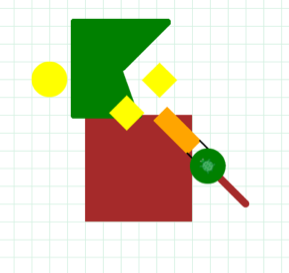
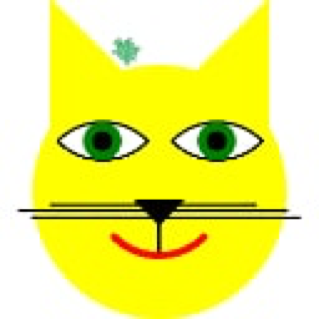
Here's a cat we drew. Her name's Puma Thurman:
Here's the code for Puma's eyes:
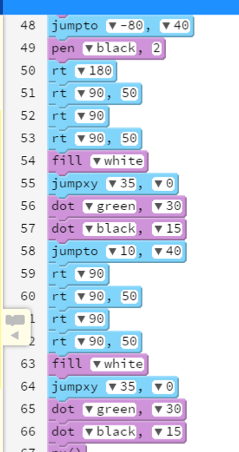
Except for the pen color, lines 48 – 57 (Puma's right eye) are the same as lines 58 – 66 (Puma's left eye). In the programming world, instead of "copying," we call this code reuse because it sounds way more professional.
Enough chatting. You've got an animal to draw.
Sample Lesson - Activity
Activity 1.04: Pick an Animal, Any Animal
As the title of this activity not-so-subtly suggests, you can pick any animal to draw for this activity. Once again, we highly recommend keeping it simple. As rad as a saber-tooth tiger might look when it's done, you don't want to still be drawing him well into next week.
Step One
We probably don't have to tell you to do this every time, do we? Since we're already here, we suppose we could give you a fresh link to Pencil Code.
(Did we mention it'd be a good idea to bookmark that link? Because it would be.)
Step Two
When you pick an animal to draw, you also need to decide if you're going to draw the whole body, or just the face. If you go the whole-body route, you're going to need a body, head, the appropriate number of legs, and possibly a tail. If you focus on the face, you'll need eyes, a nose, a mouth, ears, and at least one other feature (dealer's choice).
In our drawing of Puma Thurman below, for example, our extra feature was her whiskers. Even a drawing as simple as this took us 68 commands, so be sure you pick something simple.

You can look up pics of your animal for inspiration, but it isn't necessary. Whatever you do, don't take more than five to ten minutes on this step. You've got coding to do.
Step Three
If you try to jump into programming your animal right away, you'll have to figure out what the critter will look like and what code you need to draw at the same time. That's a one-way ticket to Brain Mush City.
Instead of giving yourself a headache, figure out what you want to draw first by sketching it on some graph paper. If you think of every square as 25 pixels, it'll help define where things should go when you're ready to actually code it. Think about the Pencil Code commands as you draw it. For starters, it'll help you determine how hard your drawing will be to make, and when you should stop adding details.
It'll also help you figure out the commands you'll need and the order that they need to happen in. Since you know that there are 25 pixels per box, you can calculate the numbers you'll need to plug in to your command parameters ahead of time. In fact, if you play your cards right, you can write almost the entire code from your rough draft sketch alone.
The 15 – 20 minutes this step should take you could save hours later.
Step Four
Draw the absolutely necessary stuff, and then add the extras if there's time. For example, we were going to add orange stripes to Puma Thurman, and make the inside of her ears pink, but those details ultimately got scrapped because they'd be too much work.
Figure out what features are must-haves for people to recognize what your animal is, and focus on getting them done—and done well—first. This kind of prioritizing is a solid skill to have in the computer programming world. (And, just between you and us, it comes in pretty handy in the rest of your life, too.)
When you're done drawing, it's a good idea to us the pu (pen up) command, and move the turtle off the drawing; otherwise, you're going to end up with the turtle lurking somewhere in your drawing, and that's not the animal we're after here.
Step Five
Before you pass Go and collect $200, do us a favor and press that big blue play button in the middle of the screen. It isn't just for funzies or killing time; if you're code doesn't actually do what you think it should, you won't know until you actually run it. That's true in every programming language and it's very important with Pencil Code.
Check for problems like
- something not showing up on the screen.
- something showing up on the wrong place on the screen.
- something showing up in the right place, but it doesn't match what we asked you to make.
Otherwise you could lose silly points for nothing, and nobody wants that.
If you want things to move faster, you can always up that turtle's speed using speed. That way you won't have to wait all day for the turtle to move. (If only we could do that with our real-life turtle…)
Step Six
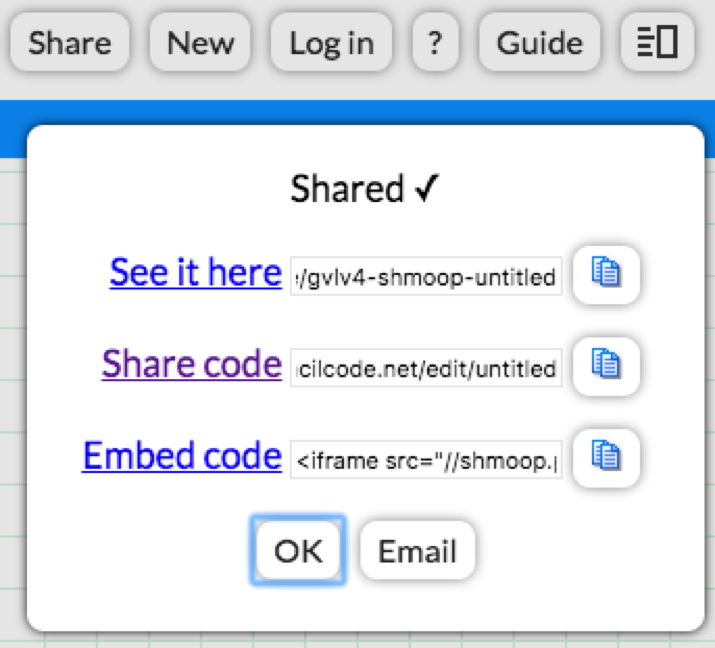
When you're done, you'll need to share your masterpiece. Up at the top right of the screen, you'll see a set of buttons doing helpful things like saving, screenshotting, creating a new project and sharing. That Share button is the one you need. Click it, and you should see some options matching the following screenshot.
Comprehension Check Rubric - 10 Points
- Course Length: 18 weeks
- Course Type: Elective
- Category:
- Technology and Computer Science
- Middle School
Schools and Districts: We offer customized programs that won't break the bank. Get a quote.