Introduction to InDesign
Welcome to the designer's layer.
- Course Length: 3 weeks
- Course Type: Short Course
- Category:
- Life Skills
- Technology and Computer Science
- High School
Schools and Districts: We offer customized programs that won't break the bank. Get a quote.
Designs are everywhere: whether you're looking at a political propaganda poster or watching this week's USA marathon of CSI, everything you see and use was made to get your attention for once reason or another. At the end of the day, though, all you can do is hope people read your meticulously-designed poster before throwing it away.
(Pro tip: if your propaganda poster ends up in the trash, you might want to re-think your brainwashing design strategies.)
Being able to design something? That takes years of work. Learning the same digital tools pros use to design things? That takes much less time (three weeks, by Shmoop's estimate)—and a little thing we like to call Adobe InDesign. After these 15 lessons of activities and projects, you'll be a pro at using InDesign to
- place text and photos.
- make shapes and frames.
- balance text and images.
- apply Styles.
- send your finished project off to be printed or digitally viewed.
You'll also learn a little psychology along the way to help understand what makes people want to squirrel away your designs instead of throwing them out without looking. But the art of designing the perfect public manipulation? That's another course entirely.
Unit Breakdown
1 Introduction to InDesign - Introduction to InDesign
Layers on layers on layers on layers...In this three-week course on Adobe InDesign, we'll go into all the basic tools you'll need to start designing flyers, posters, and even booklets—whether in print or on a computer screen. Plus, we'll give you some tips on how to make a design that grabs people's attention. That'll make them think twice before they throw that flyer in the recycling.
Sample Lesson - Introduction
Lesson 1.01: The Grand Palace of Page Layout

Welcome to the world of InDesign. If page layout was a castle, you'd be looking at the skeleton key that gets you into all its dark closets and cellars.
Erm, maybe not that door. It looks like something out of a Stephen King novel. But every other door is fair game.
Get ready for the grand tour of the InDesign workspace. You'll be walking through all the hallways, rooms, and stairwells (menus, tools, and panels) you need to get around in the program.
Most tours end there, but we'll send you to the pantry (create, open, save, and name files), and even talk about working with legacy InDesign files from a decade ago, in case you ever need to know how to play legacy file hide-and-seek. If these walls could talk, eh?
Except that door. Let's hope that door from the set of The Shining never talks.
The whole point of this lesson is to familiarize yourself with how InDesign files look and act by
- opening an existing file.
- changing the file format.
- creating a new file.
- saving using file naming conventions.
- saving legacy files.
- compressing to ZIP to turn in InDesign projects.
After you've got the basic walking tour down, you can start playing I Spy in the piles of tools. It might not be a psychological thriller (not all the time, anyway), but this lesson is like your training wheels for the whole course. Let's use that key and get inside the program.
Let's start in the next hallway, though. Just to be safe.
Sample Lesson - Reading
Reading 1.1.01a: The Grand Palace of Page Layout
The Skinny on Lesson Activity Files
Let's start off on the right foot by dissecting our lesson files a bit. Don't worry, dissecting software is way better than the frog in Bio class. InDesign is built to keep file sizes small, so instead of downloading a single file for each activity, you'll be downloading a ZIP package that contains lots of goodies in addition to the InDesign file itself. These packages can be unzipped by double-clicking on a Mac or right-clicking and clicking Expand on Windows.
Once you unzip the lesson folder, you'll find
- an InDesign file with the extension INDD.
- an InDesign file with the extension IDML.
- a folder called Links with all the photos you'll need.
- a JPG example of the finished InDesign activity (most of the time).
For best results, keep this folder and all the content together—and handy—while you read.
InDesign files have a funny file extension, INDD. This file format is considered the native file format for the most recent versions of InDesign. If you're working in InDesign versions CS5 or CS6, instead of the most recent CC Creative Cloud version, you'll want to open the InDesign file with the extension IDML instead, which is called a legacy file.
While you're reading, we recommend opening InDesign in case you want to try out the tools and topics as you go. While you hop through each reading, seeing the files and workspace on your computer will help you better understand the lesson.
That's the theory, anyway.
What's up, Doc?
When you open an InDesign document, the software will launch, and you'll see lots of different windows and tools and a big area called the document window. When you open up the first lesson file, you'll also see a welcome message. We're going to spend a moment walking through the essentials of the workspace, including:
- Document Window
- Pasteboard
- Tool Panel
- Panel Dock
- Control Panel
- Application Bar
- Menu Bar
If you were sitting at a drafting table or easel, you'd have a big flat workspace, little cubbies for tools, maybe a pencil sharpener, a Mason jar of paintbrushes, and probably an inspirational kitten poster. InDesign gives you all these (minus the inspiring poster).

The Document Window is front and center: the area with the welcome notes and a couple monkeys and lots of green in it, if you're looking at the lesson file. You can think of this as your main stage for designing. The Document Window holds exactly what's going to print or export in your final design layout.
The gray area outside the Document Window is called the Pasteboard. The Pasteboard is like a chef's chopping block: it holds all kinds of stuff you know you'll use in the recipe, but until you need it, it'll conveniently hang out just within reach. Items in the Pasteboard won't print or export in your final designs, so make sure everything you want to show up in the image is in the Document Window before you call it a PDF.
Up at the very top is your Menu Bar, where you'll see File menu, Edit menu, and all those other standard menu names.

The Menu Bar probably looks familiar to you, since a basic menu bar shows up in just about every software program you have or will ever use. What might be new are the tabs like Layout, Type, and Object, which are more specific to designing than, say…looking at a calendar. In those tabs, you'll find options for opening, saving, exporting, changing your view, adding rulers and guides, and all kinds of commands and features to help you design and share your work.
Just under the Menu Bar, the Application Bar shows some small icon drop-down menus for View, Rulers, Screen Mode, and other things we won't go into just yet.

This Application Bar has great shortcuts for a lot of features you'll be working with during the course. The feature we'll use the most from this bar is the Workspace dropdown menu at the top right of the bar. When you open InDesign, it'll probably say Essentials or Advanced.
Essentials is the perfect workspace for our first reading and activity, but that might not always be the case. (And…uh…given that we just said it's the thing we'll look at the most, you can bank on it not being the case for a good chunk of this course. Context clues, Shmooper.)
Different workspaces set up the panels differently for you, depending on the kind of project. For example, if you were working on a brochure with a lot of text in it, you'd probably reset your workspace to the Typography setting so that all the type features are right there when you need them.
The Control Panel is the long skinny strip of options along the top of your workspace, under the Application Bar and Menu Bar.

The Control Panel lets you—wait for it—control the settings for whatever tools or features you're currently using. This skinny panel changes all the time based on the tool you have selected, whether it's to help you change a font, fiddle with a color, or even adjust transparency. We love the Control Panel five-ever.
Along the left side of your workspace is another long, skinny bar with lots of icons. This is your all-powerful Tool Panel.

This is like your art bin or side drawer in your drafting table: it has tools to draw, measure, color, select, move, grab, or just about anything else you might want to do with graphics or text. If you look at the very top of this panel, you'll see a set of double-arrows. Clicking on these double-arrows lets you arrange the tools into either a long skinny column (like in the screenshot) or two shorter columns.
You might notice that some of the tool icons have a tiny triangle next to them. That triangle's meant to look like a party hat (probably), because any time you see it you know it has more tools hidden there. Clicking and holding down on that button will reveal more tools underneath for you to choose from. Don't worry, we'll go into this more later.
Along the right side of your workspace is your Panel Dock.

Just like the Control Panel, this set of panels lets you create, adjust, and fine-tune settings for whatever tools or features you're currently using. There are lots of panels in InDesign, meaning that what you see isn't all of 'em and your view might be different from ours. That's okay. More panels are located in the Menu Bar under the Window option, so you can hunt for a missing panel there if you need to.
Oh, and remember those double-arrows in the Tool Panel? You'll see them at the top of the Control Panel, too. Go ahead and click to expand them. You always have the option to expand or collapse this dock as you work in your document.
MVPs: Panels and Tools
Let's go into more detail about some of the essential tools in the Tool Panel and the popular panels in the Panel Dock. We're going to cover most—but not all—of them, so don't be concerned if we skip a tool or two. You can always play around with anything you're curious about, but you won't need to worry about us grading you on it.

Selection tool: This black arrow is what you use to select images and text boxes (also known as text frames), move things around, make stuff larger or smaller, transform or rotate objects, add color to graphics, and more. You'll probably use this tool more than any other, since it's basically your standard mouse.
Direct Selection tool: This white arrow is what you'll use later on when you start drawing things to screen. InDesign is a vector drawing program, which means that it makes images based on ratios between lines. Using this tool lets you drill down and modify the paths and anchor points of a drawing, shape, or frame.
Type tool: This, as you might expect, is how you create and format typography in InDesign. Type is a big part of layout, so this will probably be the second most-used tool of our unit. See the triangle in the corner? You've got some hidden goodies right there, yes you do. Click and hold down the button to find the Type on a Path tool. We'll hit that up more later, though.
Line tool: This one-trick pony creates straight lines. Very handy, if you need straight lines. We do; we always do.
Pen tool: The Pen tool is the vector drawing tool used in Photoshop, Illustrator, and InDesign. It takes some practice to get the hang of it, but it's the most powerful and precise vector drawing tool that exists. For real.
Pencil tool: This is the key to creating vector drawings and shapes later in the unit. There's that triangle again, this time telling you that it has several options for changing paths and anchor points.
Rectangle tool and Rectangle Frame tool: These vector drawing and frame tools act in about the same way, except the Rectangle frame tool shows an "X" to help you plan out layouts before adding any graphics. We'll use both of these tools in the unit to create shapes, frames, and placeholders in layouts. If you take a peek at the hidden tools under each of these, you'll see they're also the same. It's a dual-tool bargain.
Scissors tool: This tool cuts anchor points in a vector path. Nope, that shouldn't make sense yet. Thanks for asking.
Zoom tool: This handy little magnifying glass takes third place in our unit's "Most Used Tools" awards show. Clicking (or clicking and dragging) in your document window with the Zoom tool lets you to control how close up or far away the area you're working on appears.
Next are the MVPs of the Panel Dock. If you're following along at home, make sure you have the Essentials workspace selected from the dropdown menu in the Application Bar. That way, you'll know we're all looking at the same list.
Drumroll, please. Our winners are:
Pages

In this panel you can add, delete, and rearrange pages in your document window(s). Double-clicking on a page icon in this window will take you to that page if you're working in a multiple-page document like a magazine. We only have one page in the first lesson (a flyer for InDesign, obvi) so you should see one mini-thumbnail preview of the flyer in the Pages Panel right now. Trust us, though: you'll love this one.
Layers

This is our winning panel in our Organization category. You can create as many layers as you need to so that similar items live and work on the same layer. For example, all your typography will generally go on one layer, background elements will go on another layer, and photos or graphics will get their own layers, too. Double-clicking on a layer will bring up a dialog box that lets you name the layer, change its color-coding, and tinker with other cool settings.
Links

Part of what makes InDesign so efficient at page layout is the fact that it doesn't copy enormous photos directly into the document. Instead, it links to them, which you can control using the Links Panel.
Yep, you got that right, InDesign links out to where those high-resolution images live in another folder and uses that file pathway to show you what the images would look like if they were in your document. That way, images can stay as large as they need to without weighing down the file until it's ready to be exported.
Stroke

In vector elements, all shapes, types, and graphics have a fill (the solid color) and a stroke (an outline), both of which are independent from one another. This panel gives you all sorts of nifty options to control how the stroke looks when you draw a line.
Swatches

We're skipping the Color Panel and heading right to the Swatches Panel, because it'll be the more popular of the two in our unit. When you're using InDesign, you're probably going to be creating either something to print or something for a screen. The Swatches Panel is where you'll load the correct type of colors, as well as the specific combinations of colors you'll need for your particular project.
Two more popular panels that aren't currently visible in the Essentials workspace are the Character Panel and the Paragraph Panel, both of which relate to editing and formatting the typography you create with the Type tool.
You can find these panels in the Window menu of the Menu Bar. Take a peek at all the panels in the menu. We'll grab panels out of the Window menu every once in a while as we work our through the lessons, so…be ready for that.
Whew! That's like trying to learn your way around a new city in ten minutes. You don't have to remember every tool or menu just yet because we'll remind you of things any time we want you to do a deep exploration of an InDesign neighborhood or alley.
Sample Lesson - Reading
Reading 1.1.01b: A Whole New World (of Documents)
Page layout software without a page is like a full tank of gas without a car. (So really…it's just a giant puddle of petrol sitting out on the road.) Let's get ourselves some wheels. To create a new InDesign document, you'll always want to go to the File menu, then continue on to the New > Document submenu.
(By the way, any time we use a greater-than sign, we're telling you to click on that button in the menu, and the next one in its submenu.)

Once you click through, you'll see the New Document dialog box pop up.
Bet you didn't see that one coming.
There are a lot of choices in that New Document dialog box, but for now you only need to know about a few sections to create a new document, like:
- Intent: This is InDesign asking you what you'll end up doing with this document. Will you print it? Choose Print. Is it a web design layout? Click on Web. Making an eBook for tablet? That's Digital Publishing, if we've ever heard of it. Most of our projects will be for Print, so we'll select Print right now. If you ever want to change your answer, though, InDesign also has features that make it easy to go from print to web to digital publishing before you can say, "Holy Page Layout, Batman!"
- Number of Pages: This one is pretty straightforward. If you're designing a one-sided flyer, you enter "1." A two-sided flyer would be "2," since there are two designs. Creating a 300-page retrospective on the history of unicycle legislation? Go for it, just be sure to give InDesign a heads-up in this Number of Pages field.
- Facing Pages: If you wanted to go with that 300-page retrospective on the history of unicycle legislation (even delving into the underlying Clown discrimination in the 1950s), you'd also need to check the box for Facing Pages. Facing Pages just means you're designing something you read with two pages open at a time, like a book, a newsstand magazine, or a booklet. Checking Facing Pages lets the printer know to process each page double-sided—and in the correct order. For a single or double-sided flyer, you don't need to check this.
- Page size: If you look in the dropdown menu here, you'll see options for standard page sizes, like Letter and Tabloid. This menu is a shortcut if you plan on printing your document and need it in a standard size.
- Width and Height: If you're creating a document with custom settings that isn't an option in the Page Size presets, you'd enter the dimensions here. Maybe you want to create a CD case insert or a really huge poster or banner. Both are special print jobs that would need to be printed and trimmed from larger sheets, so there isn't a preset for them, but you can still enforce that size while designing your image by setting the width and height fields.
- Orientation: Just like in word processing programs, you can choose a Portrait (vertical) or Landscape (horizontal) orientation for your page.
The New Document dialog box will take you far in life. And by, "life," we mean today's activity.
Save Yourself
Let's get the skinny on saving InDesign files. One you have a new document set up, it won't have a name yet, and it won't be saved unless you intentionally go through the process of saving it. To save anything at all, you'll need to head to the File menu of the Menu Bar. To save a new document, you'll want to use the File > Save As… option.

That Save As… opens a new dialog box that lets you
- name the file.
- choose a location to save it.
- make sure you're saving the document in your preferred InDesign format (whether it's INDD or IDML).
File Naming Awesomeness
Yep, we warned you file naming isn't much of an action thriller. However, for the greater good of the planet—and the sanity of your teacher, who has to grade your activities—we're going to develop a file naming convention for the entire unit. It's easy, trust us.
When you go through the File > Save As… process to name your file for each lesson, save it as:
Lastname_Firstname_Activity#.indd
For example, if your name is Danny Boi Oh and you're working on the first activity, you'd save your file as:
_Oh_DannyBoi_Activity1.indd
Not bad, Danny Boi.
What the .IDML?
Software is a supermodel. If it wants to stay relevant, it has to keep up with the times—and the latest fashion trends. Because of its need to stay hip and modern, InDesign updates its software. All the time.
You'll need to keep up with all those updates, too, for good reason.
Let's say you want to send a monkey-themed flyer you created in InDesign CC to another designer friend who doesn't have the most recent version of InDesign. Maybe they have the CS6 or CS5 version instead of CC because upgrading costs money and they just can't afford it right now. If they try to open the INDD file you created in the more recent version, they'll get an error message.
Whelp, that's embarrassing.
You don't want to make your friend feel bad, you just want them to share in your love of capuchins and spider monkeys. That's where the IDML file format comes in handy. All you have to do is save your INDD file as an IDML file, send it off to your friend, and they'll be able to read all about their primate cousins no problem. IDML is called a legacy file format. It's like a translator between the new and old versions, a peacekeeper of monkeys.
(Except bald uakaris. There's no helping them.)
If you're working in CS5 or CS6, IDML is the format you're already opening. But you can actually save your file as INDD or IDML no matter what version you're on.
To save an IDML file, you want to go to the File menu, and then find the Save As option. Once the Save As dialog box pops up, look for the dropdown menu that allows you to select different formats. Inside this dropdown you'll find the option to save the file as IDML. The regular INDD option is here, too.
Ta-da.

Zip it Good
We already discussed how our lesson files are compressed or zipped because they contain multiple files, right? When you're done with each activity, you're going to zip your finished work back up into one neat folder. Be sure to include the Links folder that was included in the original ZIP file, then upload the whole package for your teacher to admire.
If you don't know how to zip or unzip your file (no judgment), take a sec to learn how to do it if you're on
From here on out, we're going to assume you know how to do it, so save the page in a bookmark, tattoo the instructions on your arm, or do something to make sure you know how to zip it.
Sample Lesson - Activity
Activity 1.01: The Grand Tour in Action
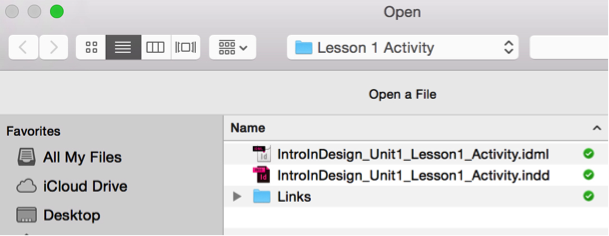
We're going to ease into this grand tour by opening our very first lesson file and poking around. Here's the Lesson 1.1 activity file for you to download and unzip. Remember from the reading that each lesson will be a ZIP file containing InDesign files and a Links folder? That's exactly what you'll find in this one.
Step One: Opening InDesign Files
Open the InDesign file for the version of InDesign you have installed on your computer. If you're using InDesign CC, open the one with the extension INDD. If you're using CS5 or CS6, open the one with the extension IDML.
If you did it right, you should see something like this:

Step Two: Moving Images and Type
Navigate to the View > Zoom Out menu and…zoom out so you can see the Pasteboard around the document. Next, grab the Selection tool from the very top of the Tool Panel, and use it to move all the pictures, shapes, and typography from the document window into the Pasteboard.
If you need to go back a step, use Edit > Undo. (We love that Undo feature. We wish we could undo eating all these doughnuts.)

Step Three: Saving and Naming InDesign Files
With the File > Save As command, save a new version of this rearranged file using our file naming conventions. Jane Smith's file would look like this: Smith_Jane_Activity1.indd. Save the new version into the same folder you downloaded.
Repeat this Save As process, but now save a new version of your file in InDesign legacy format, IDML. Do this by changing the file format to IDML in the Save As dialog box dropdown menu. Make sure it's in the same folder as the other three files, yeah?

Step Four: Create a New Document
Go ahead and close your IDML or INDD file. Now, let's start fresh and make a new document. Go to File > New > Document to bring up the New Document dialog box, then select:
- Print Intent
- 1 page
- Uncheck Facing Pages
- Letter Page Size
- Portrait Page Orientation
Click OK to create your document. You don't need to do anything inside the new document: just go to File > Save As, select INDD as the format, and navigate to the Lesson Activity 1 folder everything else is in. Save this new blank document, with the file name Smith_Jane_NewDocument.indd, except…with your name.
Step Five: Zip and Upload
Double-check to make sure all three of your named activity files are in the Activity 1 folder, and then compress the folder into a ZIP archive. Be sure to follow the zipping instructions from the second reading if you don't know how to zip it. Then, upload your ZIP file into the box below.
Bada-bing, bada-boom, you're done.
Comprehension Check Rubric - 10 Points
- Course Length: 3 weeks
- Course Type: Short Course
- Category:
- Life Skills
- Technology and Computer Science
- High School
Schools and Districts: We offer customized programs that won't break the bank. Get a quote.